Puzzle Solutions Guide
This is an ongoing guide on the solutions of the different puzzles found in Monumenta.
King's Valley Main Story
The Staff
Left wall
- Down
- Up
- Up
- Down
Middle Wall
- Down
- Down
- Up
- Up
Right Wall
- Down
- Up
- Up
- Up
Siege of Highwatch
The Truth Serum
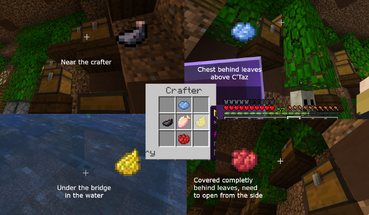
Upon entering C'Taz's workshop, He tells you that he won't help you make the serum but instead will provide some of the ingredients for the recipe that are found within the chests of the workshop.
The required Firefish is within Southern Cenote [546, 42, 355].
All four reagents are inside the workshop:
"Night Vision Reagent" (Yellow Dye) (Under the bridge.) [239, 43, 308]
"Jump Boost Reagent" (Light Blue Dye) (Facing C'Taz it is up and to the left.) [230, 52, 309]
"Blindness Reagent" (Black Dye) (Facing the crafter is on the left center wall.) [241, 52, 298]
"Fire Resistance Reagent" (Red Dye) (Facing the crafter is in the right corner area.) [248, 51, 314]
Tlaxan Crafter at [251, 49, 308]
King's Valley Dungeon Quests
Winds of War (White dungeon quest)
The Vault
| 16 | 15 | 14 | 13 | ||
|---|---|---|---|---|---|
| 1 | 12 | ||||
| 2 | 11 | ||||
| 3 | 10 | ||||
| 4 | 9 | ||||
| 5 | 6 | 7 | 8 |
9-13-1-5-9-13-2-15-1-5-9-3-5-9-8-3-5-9-6-8-9
Beasts of Men (Orange dungeon quest)
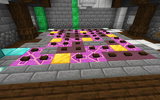
The Alchemist puzzle
The number of water bottles in the brewing stand nearest to the glazed terracotta of the colors: red, blue, and yellow.
Fill up the cauldrons with the same number of water bottles as the number in the brewing stands with the same color as the glass on top of them.
Purple is a mixture of red and blue.
In this case it would be:
- Red: 1
- Blue: 2
- Yellow: 1
- Purple: 3
Finally, push the button to weigh the water.
Scars of Magic (Light Blue dungeon quest)
The towers need to have the following heights
| 4 | 1 | 2 | 3 | 5 |
| 3 | 2 | 5 | 1 | 4 |
| 5 | 3 | 4 | 2 | 1 |
| 1 | 4 | 3 | 5 | 2 |
| 2 | 5 | 1 | 4 | 3 |
| Control buttons | ||||
|---|---|---|---|---|
Soul of The Forest (Yellow dungeon quest)
Press the button on the locations marked by an X.
Floor 1:
| North | ||||
|---|---|---|---|---|
| X | X | X | ||
| X | ||||
| X | X | X | ||
| X | X | |||
| X | X | X | ||
Floor 2:
| North | ||||
|---|---|---|---|---|
| X | ||||
| X | ||||
| X | ||||
| X | ||||
| X | X | |||
Floor 3:
| North | ||||
|---|---|---|---|---|
| X | ||||
| X | X | |||
| X | X | X | ||
| X | X | |||
| X | ||||
Shurima's Big Day Off (Forsworn Sanctum dungeon quest)
Pull levers in this order:
- Top White
- Bottom Purple
- Top Orange
- Top Blue
- Bottom Yellow
- Top Yellow
- Bottom Orange
- Bottom White
- Top Purple
- Bottom Blue
Roguelike Calibration Lock (Ephemeral Corridors dungeon puzzle)
Anthill Puzzle
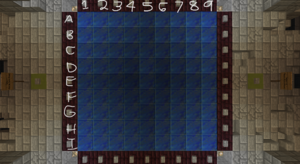
You must recreate the lapis structure shown with the buttons. Each button raises each block in that row/column. A block cannot be raised more than once in the same layer, meaning pressing two crossing buttons won't raise the connecting block a second time.
Following this numbering and lettering pattern:
Layer 1: Press buttons 4, 6, and E
Layer 2: Press buttons D, E, and F
Layer 3: Press buttons E, and 5
Layer 4: Press buttons 2, 8, B, and H
Layer 5: Press buttons 4, and 6
Press the yellow button and you should be teleported into the Ephemeral Corridors Lobby.
Unveiled (Malevolent Reverie dungeon quest)
First
| o | o | x | o | o |
|---|---|---|---|---|
| o | o | x | o | o |
| x | x | x | x | x |
| o | o | x | o | o |
| o | o | x | o | o |
Step 1: Press the left button. (Ignite Side Dissolver)
Step 2: Press the right button. (Rotate Slab Configuration)
Step 3: Press the left button. (Ignite Side Dissolver)
Step 4: Press the right button. (Rotate Slab Configuration)
Step 5: Press the left button. (Ignite Side Dissolver)
Step 6: Press the right button. (Rotate Slab Configuration)
Step 7: Press the left button. (Ignite Side Dissolver)
Step 8: Press the submit button. (Right wall when facing the 3 buttons.)
Second
| x | x | x | x | x |
| o | o | x | o | o |
|---|---|---|---|---|
| o | o | x | o | o |
| o | o | x | o | o |
| o | o | x | o | o |
Step 1: Press the left button. (Ignite Side Dissolver)
Step 2: Press the right button. (Rotate Slab Configuration)
Step 3: Press the middle button. (Ignite Center Dissolver)
Step 4: Press the right button. (Rotate Slab Configuration)
Step 5: Press the right button. (Rotate Slab Configuration)
Step 6: Press the middle button. (Ignite Center Dissolver)
Step 7: Press the left button. (Ignite Side Dissolver)
Step 8: Press the submit button. (Right wall when facing the 3 buttons.)
Third
| x | o | o | o | x |
|---|---|---|---|---|
| o | o | o | o | o |
| o | o | x | o | o |
| o | o | o | o | o |
| x | o | o | o | x |
Step 1: Press the middle button. (Ignite Center Dissolver)
Step 2: Press the right button. (Rotate Slab Configuration)
Step 3: Press the middle button. (Ignite Center Dissolver)
Step 4: Press the right button. (Rotate Slab Configuration)
Step 5: Press the middle button. (Ignite Center Dissolver)
Step 6: Press the right button. (Rotate Slab Configuration)
Step 7: Press the middle button. (Ignite Center Dissolver)
Step 8: Press the submit button. (Right wall when facing the 3 buttons.)
Final
| x | x | x | o | o |
|---|---|---|---|---|
| o | o | x | o | o |
| o | o | x | x | x |
| o | o | o | o | o |
| x | o | o | o | o |
Step 1: Press the left button. (Ignite Side Dissolver)
Step 2: Press the right button. (Rotate Slab Configuration)
Step 3: Press the right button. (Rotate Slab Configuration)
Step 4: Press the middle button. (Ignite Center Dissolver)
Step 5: Press the right button. (Rotate Slab Configuration)
Step 6: Press the middle button. (Ignite Center Dissolver)
Step 7: Press the left button. (Ignite Side Dissolver)
Step 8: Press the submit button. (Right wall when facing the 3 buttons.)
Order: center, side, rotate, side, rotate, rotate, center, rotate, rotate
King's Valley Side Quests
Nelfine's Curse
Overgrown Laboratory puzzle
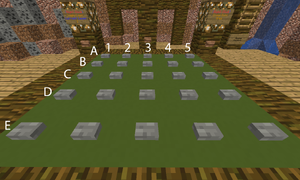
Taking in account the numbers and letters in the picture, this puzzle can be completed by pushing the following buttons in their respective layer:
- Layer 1: 3C
- Layer 2: 3B, 3C, 3D
- Layer 3: 2C, 3C, 4C
- Layer 4: 1C, 2B, 2C, 2D, 4B, 4C, 4D, 5C
- Layer 5: 2C, 3B, 3D, 4C
- Layer 6: 1C, 2C, 3B, 3D, 4C, 5C
- Layer 7: 1C, 3B, 3D, 5C
A Crown of Madness
Opal Minecart puzzle
(add)
Lost In My Mind
Bed puzzle
(add)
A Vault of Glass
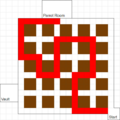
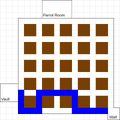
Maze Puzzle
-Buy a Cheap Beer from the Tavern for 1 xp
-Make it to the end of the maze and click the parrot with the Cheap Beer in your inventory
-Go back to the start and follow the blue path
Time to Reflect
Puzzle 1
- Press the both of the double buttons on the left wall.
- Press the top button of the double button on the right wall.
- Press the single button on the right wall.
Puzzle 2
- Look at the ceiling to learn the location of the barrier blocks and use them to jump across.
Puzzle 3
- Press orange, yellow, magenta and black, and then complete the jumping puzzle by looking at the two mirrors to figure out where to jump next.
Starry Night
Mayleen Tower Gear puzzle
- press gear array 1 button three times.
- press gear array 2 button two times.
- press gear array 3 button two times.
- press gear array 4 button two times.
Starrier Night
Mayleen Basement Gear puzzle
- press gear array 1 button three times.
- press gear array 2 button zero times.
- press gear array 3 button two times.
- press gear array 4 button one time.
Fishing Village gear puzzle
- press gear array 1 button two times.
- press gear array 2 button two times.
- press gear array 3 button three times.
- press gear array 4 button three times.
Gaius Basement Gear puzzle
- press gear array 1 button three times.
- press gear array 2 button five times.
- press gear array 3 button three times.
- press gear array 4 button two times.
- press gear array 5 button one time.
Burning Bright
Toxin Lab Lock
Note: You can hit submit as many times as you want and it won't penalize you.
Hit Change Color until the output color is Orange then press submit.
Hit Change Color until the output color is Green (Not Lime/Light Green) then press submit.
Hit Change Color until the output color is Purple (Not Magenta) then press submit.
Hit Change Color until the output color is Lime (Not Green) then press submit.
Hit Change Color until the output color is Brown then press submit.
A Study in Crimson Part 2
Right click the crystals to take the dye out. Right click with dye to put dye in.
Crystal colors and coords from east to west:
Yellow (Deva) [-2350, 212, 1211]
Orange (Ixume) [-2371, 212, 1201]
White (Quetzalcoatl) [-2396, 225, 1226]
Crimson (Vaessini) [-2403, 217, 1181]
Light Blue (Magic) [-2431, 226, 1218]
Magenta (Myrahg) [-2459, 230, 1203]
King's Valley Misc
Lowtide Library puzzle
To reach the congress outpost in Lowtide, the player must press four buttons in order. All of the buttons are only intractable for a short time, so the player must move quickly.
- The first button is on a bookshelf in Helring's room of the Lowtide library (720 71 522).
- After pressing the first button, the iron trapdoor in the corner of Helring's room will briefly open (726 70 528). The second button is under this trap door.
- When exiting Helring's room, their is a ladder to the players right. The third button is at the top of this ladder. The stone brick block at coordinates 707 81 515 will be pulled away to reveal the third button.
- When exiting the Lowtide library, the player will see a tree next to the teleportation building. The grass block in front of the tree at coordinates 702 74 486 will be pulled away to revel the fourth button.
- After pressing the fourth button, the player should run to the bookshelves on the second floor of the Lowtide teleportation building (719 79 491). The left side of the bookshelves will be briefly pulled away, revealing the entrance to the congress outpost.
Here is a video of the puzzle being solved, starting at 3:56:
Celsian Isles Main Story
Raiding Party
| Lights | |
|---|---|
| 5 | 7 |
| 8 | 3 |
| 2 | 6 |
| 1 | 4 |
The Wizard's Apprentice
- 3
- 1
- 4
- 3
- 1
- 3
- 2
- 4
R is for Reprisal
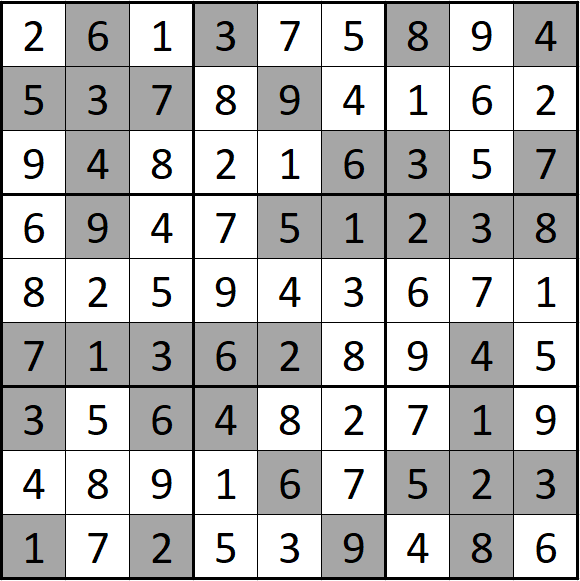
Sudoku Puzzle
Celsian Isles Dungeon Quests
The Lost Empire (Lime dungeon quest)
Viridian Shrines
- Activate shrine 1 and 2
- Activate shrine 4
- Deactivate shrine 1
- Activate shrine 6
- Deactivate shrine 2
- Activate shrine 5
- Activate shrine 3
- Deactivate shrine 5 and 6
- Activate shrine 2
- Activate shrine 6
The Gem of Isnhir (Gray dungeon quest)
Tehkma Ka's tomb
| Anhk |
|---|
| 1 |
| 0 |
| 1 |
| 1 |
| 0 |
| 1 |
Where 1 is a button you press and 0 is a button you don't press.
Mirrored Egos (Light Gray dungeon quest)
Alutana's Statue
Pressing activate makes the far wall show a random color sequence and then blinds you. Take a screenshot of the colors on the wall.
Secrets Best Left Forgotten (Cyan dungeon quest)
Rubik's Cube
Hit the six sides in this order:
- west
- top
- north
- south
- east
- bottom
Note: to rotate the top face of the cube, hit any square in the top row.
Rapacity (Purple dungeon quest)
The Shredded Notes
- Piece 1/4 is located at -1512, 95, -1040.
- Piece 2/4 is located at -1598, 69, -1142 via parkour.
- Piece 3/4 is located at -1585, 40, -1133 by flicking a nearby lever and running there.
- Piece 4/4 is located at -1559, 86, -1081 by shifting the seats shown in the middle row.
The Father's Study
- Go inside the bottom right entrance and push the button.
- Proceed to go to the corrupted world and head inside the top left entrance. Do not push the button.
- Use the Magic Mirror to return to the regular world and push the button.
- Return to the corrupted world and go to the bottom-right entrance and push the button.
- Go up to the top right entrance and push the button.
- Grab the book and click on any button on an open entrance in the corrupted world.
- Return to the original world and retrieve the Excommunication book.
Fred's Bizarre Adventure (City of Shifting Waters quest)
Stone Fred puzzle
- Flip all levers up
- Flip the top lever down
- Flip blue down
- Flip purple down
- Flip red down
- Flip lime down
- Flip blue up
- Flip purple up
- Flip red up
Note: Wait for the water to flow fully between each step.
Celsian Isles Side Quests
Overdoomed
Wispervale Drinking Competition
- Stout Beer
- Whiskey
- Hard Cider
- Hard Cider
- Stout Beer
Alternately just buy poison from the Assassin specialist master and skip the minigame with it and get the better quest reward.
Ten Thousand Bets
Rigged Casino Chip puzzle
Dealbreaker
Basement Vault
- Flip light blue
- Flip lime up
- Flip lime down
A Lost Cause
Crystal Haven puzzle
- fill se 3
- fill ne 2
- fill sw 2
- fill nw 1
- fill nw barely before sw
if the wrong side activates too soon just use an empty bottle to take water back out
Alric's Legacy
Alric's Rift puzzle
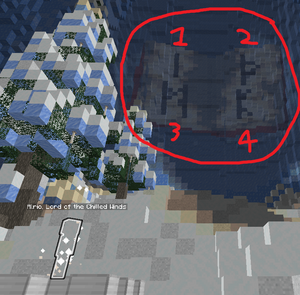
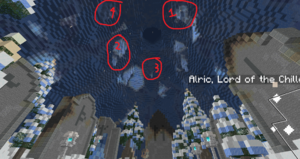
Shoot down the icicles on the ceiling in the order listed on the wall behind the spirit.
Order on wall behind spirit:
Order of the icicles to shoot down:
Primeval Creations I
Guide (outdated, puzzles are now randomized):
Tesseract Puzzle
The goal of this puzzle is to make the six overlapping points on the rings be the same.
White Puzzle
See https://www.jaapsch.net/puzzles/clock.htm.
Primeval Creations II
Guide by kindabland (updated as of Feb 2024):
Orange Puzzle
- Move the Blaze to the holding pen.
- Move the Creeper to the Blaze pen.
- Move the Slime to the Spider pen.
- Move the Zombie to the Zombie pen.
- Move the Creeper to the Slime pen.
- Move the Slime to the Blaze pen.
- Move the Spider to the Spider pen.
- Move the Wither to the Creeper pen.
- Move the Slime to the Wither pen
- Move the Spider to the Blaze pen.
- Move the Zombie to the Spider pen.
- Move the Creeper to the Zombie pen.
- Move the Spider to the Slime pen.
- Move the Zombie to the Blaze pen.
- Move the Creeper to the Spider pen.
- Move the Spider to the Zombie pen.
- Move the Zombie to the Slime pen.
- Move the Slime to the Blaze pen.
- Move the Wither to the Wither pen.
- Move the Creeper to the Creeper pen.
- Move the Spider to the Spider pen.
- Move the Zombie to the Zombie pen.
- Move the Slime to the Slime pen.
- Move the Blaze to the Blaze pen.
Magenta Puzzle
- Inflict the Wither Skeleton with Fangilium.
- Inflict the Spider with Enderpox.
- Inflict the Creeper with Enderpox.
- Inflict the Spider with Blaziod.
- Inflict the Creeper with Creepititus
- Inflict the Zombie with Fangilium
Primeval Creations III
Light Blue Puzzle
Click the button on the floor, cycle through the numbers until left sign on the slabs is 1, and right sign on the slabs is 5:
- Start by finding the column on the left and right side of the wall with gray at the bottom
- Go left 6 columns (wrapping around to the other wall as necessary)
- Note the color at the top of this column
- Find the column where the noted color is at the bottom
- The color at the top of the column found in step 4 is the color you should input into the mechanism. You will know it's correct when the input result matches the background color.
- Repeat the above steps with purple at the bottom- shifting counter-clockwise 7 times, cyan at the bottom - shifting left 8 times, white at the bottom - shifting left 9 times, and finally pink at the bottom- shifting left 7 times (not 10 times)
Yellow Puzzle
R = Red
BR = Brown
BL = Blue
W = White
| R | BR | BR | BR | |||||||
|---|---|---|---|---|---|---|---|---|---|---|
| R | R | R | R | R | R | BR | ||||
| BL | BL | BL | BL | BL | BL | BL | BL | R | BR | |
| BL | R | R | R | R | R | R | BL | R | BR | |
| BL | R | BR | BR | BR | R | BL | R | BR | ||
| BL | R | BR | W | BR | R | BL | R | BR | W | |
| R | BR | W | BR | R | R | R | BR | W | ||
| R | BR | W | BR | BR | BR | BR | BR | BR | W | |
| R | BR | W | W | W | W | W | W | W | W | |
| R | BR | BR | BR | BR | BR | BR | ||||
| R | R | R | BR | |||||||
| Entrance | ||||||||||
Primeval Creations III.9
Crimson Puzzle
- Brown
- Light Blue
- Yellow
- Orange
- Brown
- Green
Primeval Creations IV
Lime Puzzle
Snowballs are zero's, sticks are one's. You read it from left to right and top to bottom and convert the binary to decimal then find the corresponding spot.
| 1 | 2 | 3 | 4 | 5 | 6 | 7 | 8 | 9 |
| 10 | 11 | 12 | 13 | 14 | 15 | 16 | 17 | 18 |
| 19 | 27 | |||||||
| 28 | 36 | |||||||
| 37 | 45 | |||||||
| 46 | 54 | |||||||
| 55 | 63 | |||||||
| 64 | 72 | |||||||
| 73 | 74 | 75 | 76 | 77 | 78 | 79 | 80 | 81 |
Example:
0100110 = 38
Pink Puzzle
Queen's game
| 1 | 2 | 3 | 4 | 5 | 6 | 7 | 8 | 9 | |
| 1 | Z | ||||||||
| 2 | Z | ||||||||
| 3 | Z | ||||||||
| 4 | Z | ||||||||
| 5 | Z | ||||||||
| 6 | Z | ||||||||
| 7 | Z | ||||||||
| 8 | Z | ||||||||
| 9 | Z |
Primeval Creations V
Video guide (describes gray's puzzle mechanics correctly, but has out of date color labels)
https://www.youtube.com/watch?v=5mY-q1XUIio
Gray Puzzle
Example solution, as of the June 4th "nooo you can't just press them in wool dungeon order" hotfix:
press in order, the starting position labels for S, SW, W, NW, NE, E, SE
aka Orange, Gray, Pink, Lime, White, Magenta, Light Blue
Light Gray Puzzle
| A1 | B1 | C1 | D1 |
| A2 | B2 | C2 | D2 |
| A3 | B3 | C3 | D3 |
| A4 | B4 | C4 | D4 |
View from tower platform:
- A1 2
- A2 4 rotate
- A3 1
- A4 3 rotate
- B1 4 rotate
- B2 4 rotate
- B3 4 rotate
- B4 4 rotate
- C1 4 rotate
- C2 4
- C3 3 rotate
- C4 3 rotate
- D1 3
- D2 4 rotate
- D3 2
- D4 3
- A 1 green
- B 4 yellow
- C 3 red
- D 2 green (locked)
- 1 2 red
- 2 4 blue
- 3 1 blue (locked)
- 4 3 yellow
Primeval Creations VI
https://www.youtube.com/watch?v=zZhO8vCzRfM (Kindabland video for puzzle solutions.)
Cyan Puzzle
Rook's Game
Purple Puzzle
5 - fill, 5 - send, 3 - recycle, 5 - send, send to subject
3 - send, 3 - fill, send to subject
5 - recycle, 3 - send, send to subject
5 - recycle, send to subject
3 - fill, 3 - send, 3 - fill, 3 - send, 5 - recycle, 3 - send, 3 - fill, 3 - send, send to subject
Primeval Creations Zero One Three Wools Minus Two
Teal Puzzle
Video guide
https://youtu.be/zZhO8vCzRfM?si=iCYutDjGa8AHI5Cc&t=156
This puzzle has a random solution each time.
Trial and error each pillar. For each pillar, one at a time, change it to another block. Check your solution after each change. If the number of correct pillars goes up, then move onto the next pillar. Repeat until all four pillars are correct.
Bring Him Baack
Siren Shrines
- Main shrine (-473,24,227); Place all five required blocks here.
- Mistport shrine (-555,107,1344): iron ore (bottom)
- Ishnir shrine (231,42,531): end stone bricks (bottom right)
- Ocean shrine 1 (-1080,38,-319): jack o' lantern (top left)
- Ocean shrine 2 (-138,40,-286): gold block (top right)
- Chillwind shrine (-1506,144,617): redstone lamp (bottom left)
Final solution: Up,Left,C,C,Up,Down,Down (-1848,85,-127)
- Puzzle Solutions

